September 2019 | Part II

Multi-Monitor Routing is Here!

Version 1.4     September 20, 2019.

This release doubles your routing power by doubling your monitors!


Multi-monitor Routing 

Have you ever felt your map and your grids were competing for space, and that you just needed a bigger map? Well, today is your day.  You can move your map to a second monitor!  This feature works for both Shipment Management and Route Planning.

Although shown on a different monitor, the map will still be connected to the grids, and everything will work as before—whatever you do on the map will also happen in the grids, and vice-versa. However, you’ll have better visibility to what you’re doing on BOTH screens!

To move the map to a second monitor, follow these steps:

  • Press the “Pop Out” button located in the upper right corner of the map.
  • The map will pop into a new window.
  • Drag that new window to your other monitor and maximize it.

To restore the map to its original position, click the “X” in top right corner of the map window.

For a quick demonstration, watch this video:


Route Optimization is now Dynamic

The Route Optymizer button (formerly “Optymize”) now routes dynamically. That means it will think like you, a highly skilled planner, but at lightning speed. It will consider these things:
 
1. Zone boundaries (sort of). The logic will send a route outside its normal zone if that is the best way to serve the customers and reduce cost. But, for the most part, routes will stay in familiar zones.
2. Each route’s start time
3. When and Where each route should become empty
4. Consignee receiving time windows
5. Time needed to deliver each stop
6. Travel times between stops
7. Equipment needs (liftgate, etc.)
8. Trailer capacity
9. How much space each shipment needs in the trailer
10. The maximum number of stops YOU want on a route
11. When each pro will arrive at your terminal
 
 
To use it, highlight the route(s) you want to optymize and press Route Optymizer. You can select one, some, or all the routes (they must be Unlocked or Partially Locked).
 
Enter the number of liftgate trailers available for the selected routes, and the maximum number of stops per route. Press Confirm and let RouteMAX do the rest.
 
Now, review the routes. You still have the option to make manual adjustments.
 
For a demonstration, please watch this video:


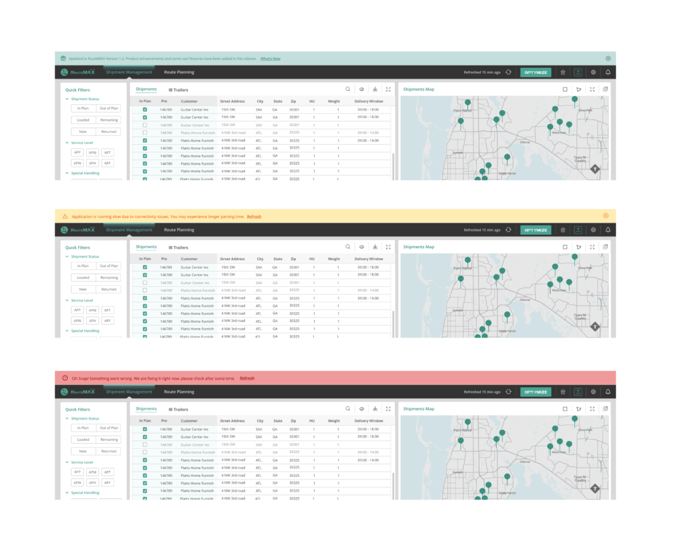
Status Notifications

When there’s something you need to know (new features, data problems, etc.) we’ll put a message at the top of the screen.

Green: Good news & new features!

Yellow: Temporary data slowdowns & minor problems.

Red: System outages.  We strive to make these events rare, and to fix them immediately.

.

Notification-bars-1030x835


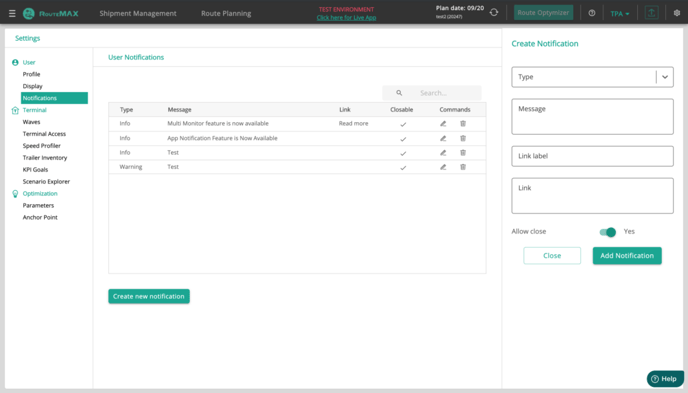
Status Notification Creation by Administrative users

Administrative users can send messages to all users—the type shown in the above section.
 
To create a message, go to “Notifications” on the Settings page and click “Create New Notification.” Populate the four windows on the right as needed and click “Add Notification.” The slider for “Allow Close” determines whether terminal users can close the message on their screens.
 
Message content should determine the type: Information (green), Warning (yellow), or Error (red). Edit or delete the messages when appropriate.
Screen-Shot-2019-09-20-at-1.21.42-PM-1030x589


Other Improvements & Bug Fixes:

As always, we made some behind-the-scenes improvements to make RouteMAX work better and faster for you.